
Phone photography · Product Studio
How to Take Product Photos with Your Phone for Product Studio
Give Product Studio a clear view of the product you actually sell. A level camera, readable details and a little care with light give the model a stronger reference for placing it into your chosen scene.
· 7 min read
1. Keep the camera level and close to product height
Place the product on a steady surface. Hold the phone upright with its lens roughly level with the middle of the product. Take a straight-on or gently angled view that clearly shows its main face. Avoid looking sharply down on it, pointing steeply upwards, or tilting the phone sideways.
The first reference establishes the product view you want to use. Product Studio is instructed to preserve that view and adapt the scene around it where necessary. A steep angle in the reference is therefore harder to use for a level, front-facing composition.
2. Make the product large, with room around every edge
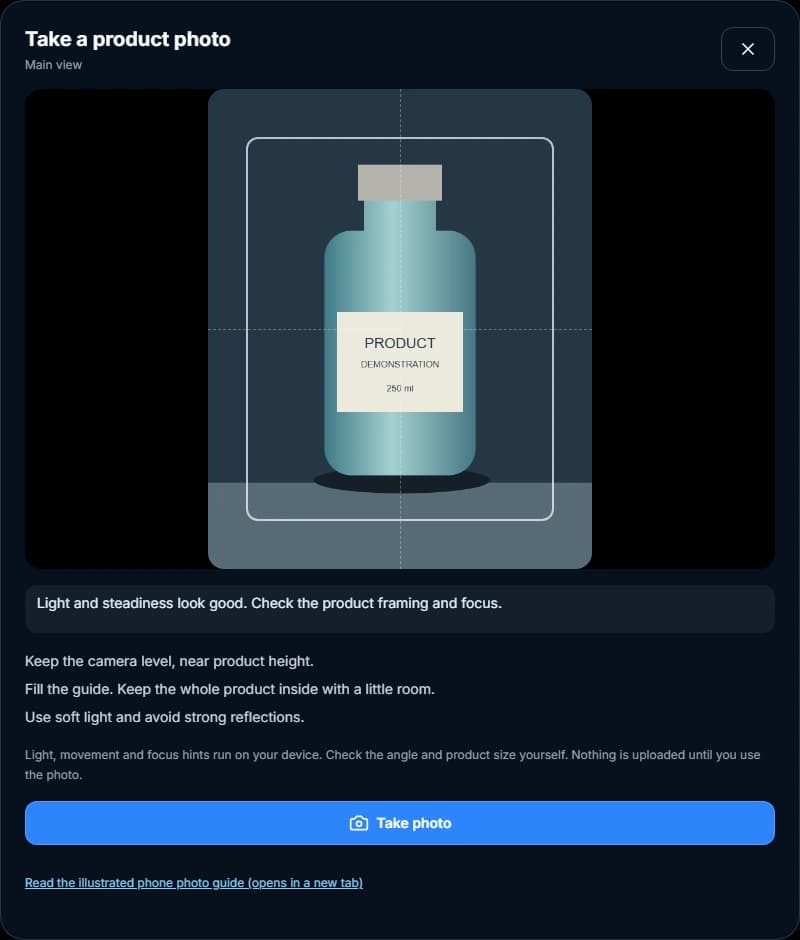
Move close enough that the product fills most of the guide, while keeping the full outline visible. Leave a little space above, below and beside it. Check handles, caps, feet and thin edges: none should touch the boundary or disappear outside the photo.
Use a simple background and avoid hands or unrelated objects covering the product. If a close view looks distorted, step back slightly rather than pushing the lens against the item. The optional second reference should show another clear view of the same product, not a different variant.
3. Look for readable details and soft light
Try a bright room with soft window light from the side. Adjust the position until labels and texture are readable without large white reflections. Keep the phone steady and wait for focus to settle. Review small text after taking the photo; a pleasing thumbnail can hide a blurry label.
The camera offers local hints about light, movement and possible focus issues. A smooth bottle or plain package may trigger a focus reminder even when sharp. These hints never prevent you from taking a photo, and they do not assess product identity, angle or framing.
4. Take a photo directly in Product Studio
- Choose your generated scene in Product Studio.
- Under Main view, select Take photo and allow camera access. The rear camera is preferred when available.
- Use the lines to level the phone and the frame to position the product. Follow any useful light or steadiness hints.
- Take the photo, then choose Retake or Use photo. Only Use photo uploads the image.
- Add a second view if helpful, enter placement instructions and create the composition.
Camera references automatically enable studio refinement during placement, including when selected again from Recent uploads. You do not need to add another instruction. If the browser camera is unavailable, try Use phone camera or upload an existing photo.
5. Add studio refinement to an existing photo
Upload a JPG, PNG, WebP, HEIC or HEIF photo from your phone or computer. For a self-shot reference that needs photographic refinement, click + Phone photo to studio beside Realistic 3D object in Art direction.
This adds the following editable instruction. For ordinary uploads, removing the complete instruction removes its automatic system addition. Camera references retain their automatic refinement even when the Art direction field is empty.
Refine only the photographed product to professional studio-photo quality when compositing it into the selected scene. Correct exposure, white balance, noise, and distracting capture reflections only on the product; preserve the background's exposure, white balance, and lighting atmosphere. Preserve the product's geometry, proportions, viewing angle, true colors, material finish, logos, labels, and actual product details. Match the product to the scene lighting with local contact shadows and reflections without redesigning the product or inventing missing details.Refinement happens while the product is placed into the scene. The original reference stays in your private account, and this option does not create a separately retouched image or add an extra generation step.
6. Compare the result with your real product
Look closely at the silhouette, proportions, color, material finish, logos and every visible label. Check that reflections and contact shadows agree with the selected scene. Retake a poor reference instead of asking the model to invent unreadable details.
The instructions aim to improve photographic presentation while preserving the product, but they do not guarantee exact fidelity. Review the result before using it in a store, advertisement or client delivery.
Frequently asked questions
Are the camera checks powered by AI?
No. Light, movement and possible focus issues are checked locally on your device. They do not recognize the product or measure its camera angle. Use the guides and review the photo yourself.
Can I upload an iPhone HEIC photo?
Yes. Product Studio accepts HEIC and HEIF as well as JPG, PNG and WebP, up to 50 MB and 50 megapixels. Your original is retained privately and a compatible preview is created.
Does studio refinement change my uploaded photo?
No. The instruction applies when the product is placed into your selected scene. It does not edit your uploaded original or create a separate retouched photo.
Can the model recover unreadable labels?
Do not rely on it to recover missing or blurred details. Retake an unclear reference and compare the generated product against the original before publishing.